Fitting Clearview Mirrors

Nissan Navara Forum

Help Support Nissan Navara Forum:

This site may earn a commission from merchant affiliate links, including eBay, Amazon, and others.

Old.Tony

Administrator
Administrator
Joined
Oct 3, 2009
Messages
18,138
Reaction score
831
Location
Mid Coast Region, NSW, Australia
We decided to replace our mirrors with Clearview mirrors. There might be an issue in WA with them, so before we go over to WA we'll be flaring our guards with fibreglass, effectively widening the vehicle body and bringing the mirrors well within legal limits over there.

Here's a step-by-step, mostly on removing the door panel, guide to getting the old mirror out. Installation is a reversal of the process.

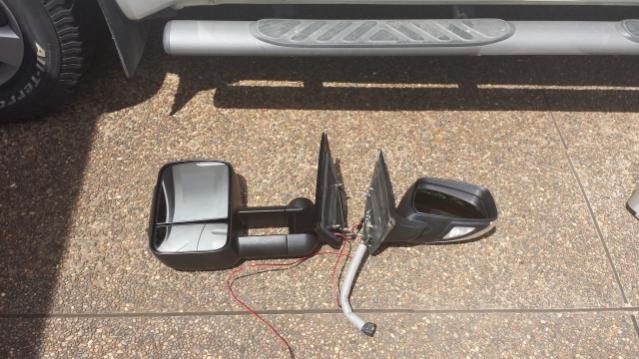
I replaced my driver's side first and placed it on the ground next to the unmounted passenger Clearview mirror for a size comparison. There's at least twice the mirror space in the new mirrors. The top 2/3 is electric, the bottom 1/3 is manual but convex, so you see a wider angle.

attachment.php


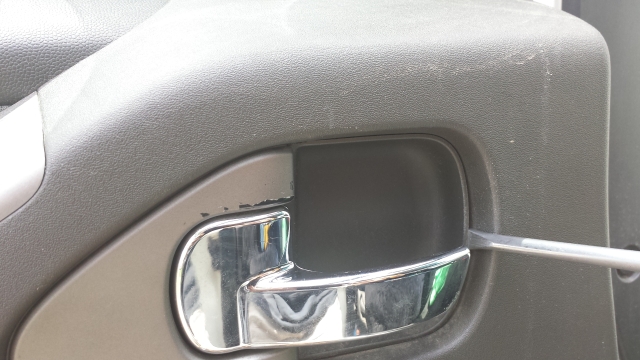
On to removing the door panel. First, we need to get to the three screws that hold the door panel in place. The first is behind the little plate that's behind the interior door handle. Put a flat-bladed screwdriver in behind it as shown in the image and lever it towards the handle - once you can get your finger in behind it it should just pull out.

attachment.php


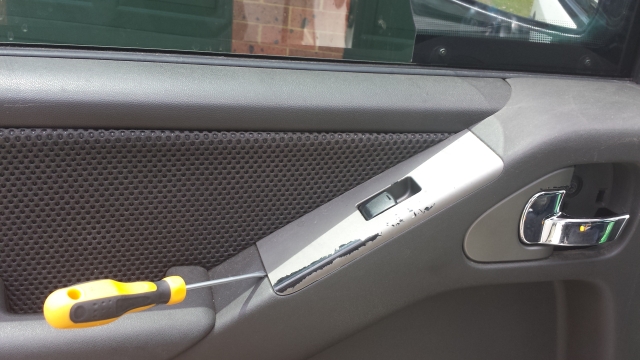
You can remove the window switch panel so that you can unplug it and remove the door panel completely, unless you're happy to hold it up the whole time. It has a retaining clip at the rear near where I've placed the screwdriver, and a locating lug at the front - don't try lifting it from the other side, you'll break it.

attachment.php


The armest is next and it's a simple lift-up. Makes it easy if your armrests are smelly, you can just go replace them quickly instead of washing your elbows. You need to remove it - just grasp it where indicated and lift, then lift the front and out it comes.

attachment.php
 

Attachments

  • 01 - Mirror size comparison.jpg
    01 - Mirror size comparison.jpg
    45.8 KB · Views: 1,411
  • 02 - Remove door lever backing.jpg
    02 - Remove door lever backing.jpg
    186.2 KB · Views: 1,402
  • 03 - Lift switch panel out.jpg
    03 - Lift switch panel out.jpg
    186.5 KB · Views: 1,348
  • 04 - Lift armrest up.jpg
    04 - Lift armrest up.jpg
    156.3 KB · Views: 1,225
Now that the three screws are uncovered, undo them (10mm socket or Philips PH2 bit). You might need these again later when reassembling the door so try not to throw them at passing Hiluxes.

attachment.php


With the door panel undone, you can go around the edge underneath and unclip it - it has those bloody stupidly difficult plastic clips that usually break their heads rather than release from the holes in the metal door. There is one halfway up each side, and 4 along the bottom of the panel. Pop them out, then the panel should lift up and away.

Now we need to remove the small front panel. This has three plastic expander pins with tiny slits under the head. Once you have pulled one out you'll see how easy they are, but you have to do it without damaging them - I imagine these are probably $20 each or something @ your dealer.

attachment.php


Use a small flat screwdriver to lift the head out. It should not require much pressure at all.

attachment.php


Here's what the pin looks like. Now that you know, you shouldn't break any!

attachment.php
 

Attachments

  • 05 - Ready to undo 3 screws circled.jpg
    05 - Ready to undo 3 screws circled.jpg
    73.4 KB · Views: 1,160
  • 06 - Front panel pins.jpg
    06 - Front panel pins.jpg
    58.2 KB · Views: 1,167
  • 07 - How to remove pin.jpg
    07 - How to remove pin.jpg
    128.6 KB · Views: 1,160
  • 08 - Pin appearance.jpg
    08 - Pin appearance.jpg
    149 KB · Views: 1,164
Once you've removed the pins, you have to deal with the double-sided adhesive tape they also used to hold this panel in place (which probably stops it from buzzing, so don't remove it). Peeling it away from the top and looking down as you separate the tape from the door is probably the best way to do it, or just let it tear (like I did) but leave it positioned where it was. Remove the panel.

attachment.php


Now you can see the nuts on the mirror mounting bolts (arrowed above). A 10mm ordinary socket will get 'em - I didn't use a deep socket - but it's not time for that yet, have to undo the electrics first.

The electrics are hidden behind the weather shielding shown below.

attachment.php


You only need to peel back a small section of the shield to do the job. I've arrowed the clip in the picture below - use either pliers to compress the plastic spring or a flat screwdriver.

attachment.php


Having undone the clip, you can pull the harness out ...

attachment.php
 

Attachments

  • 09 - Front panel removed showing retaining nuts.jpg
    09 - Front panel removed showing retaining nuts.jpg
    67 KB · Views: 1,225
  • 10 - Door panel removed.jpg
    10 - Door panel removed.jpg
    171.9 KB · Views: 1,145
  • 11 - Removing weather shielding.jpg
    11 - Removing weather shielding.jpg
    67 KB · Views: 1,158
  • 12 - Mirror harness unclipped.jpg
    12 - Mirror harness unclipped.jpg
    175.1 KB · Views: 1,125
And you can press the tab (shown near my thumb) to release the plug halves.

attachment.php


Once the harness is apart, undo the two lower nuts shown in the previous post, then grab the mirror and undo the upper nut. The mirror can then be pulled out, but watch where the cable comes up. There's a track for the window to rise in - your cables have to go around this track, not through it! The key is to keep the cable towards the door hinge.

Once you've got the old mirror off, you can put the new mirror in by reversing the process. Poke the wires down into the door, retain the mirror with the top nut, then connect the electrics. NOW is the time to turn on the ignition and test it!

This is what the mirror looked like after fitting ... it's bloody huge!

attachment.php


Hope someone finds the pics useful. There's a DVD supplied with the mirrors that covers a lot of this and shows how easy things are to unclip, but maybe you want to get to your speakers, or fix your window switch, or just take your mirrors off to give 'em a spray paint.
 

Attachments

  • 13 - Undoing mirror harness.jpg
    13 - Undoing mirror harness.jpg
    150.2 KB · Views: 1,246
  • 14 - Mirror fitted.jpg
    14 - Mirror fitted.jpg
    139.3 KB · Views: 1,203
Nice write up Tony thank you. I was going to get into the loom to add some extra LED's to the courtesy lights that are built into the mirror.

Cheers Robski
 
I'm happy with the mirrors, certainly have to get used to them - they're higher than they are wide unlike the stock mirrors. There is a small amount of vibration noticeable in the upper mirror - probably should have expected that with half an acre of glass there. The worst problem is being able to see EVERY idiot's high beam behind me and not able to do much about it except fire off a 20W CO2 laser in their direction.

If you look closely at the first picture, you'll see some red/black wires - I pre-wired the mirror for the puddle lights, which are missing from these. I've got some T10 globes and sockets coming, when they get here I'll figure out a diffuser, light base and how to get the lower mirror out so I can slice in and make the puddle lights in these. The pins are missing in the connector - but I'll work around that.
 
I fitted mine a few months ago and love the wide field of view. Instructions were excellent. Makes the nav look a bit like dumbo though.
 
Hi Tony,
Forgive me for not reading all of the thread.
I have a camper trailer, would this be an advantage to me, as I find the standard nav one's Are not really appropriate when towing something behind you, I have a very strong philosophy that I would like to see clearly what I am towing,to maintain safety for myself and others around me in other cars.

Would love to know your feedback??

Cheers Geoff

YEP!GOT A V6 'BUT I LIKE TO CUSTOMISE.
 
If you need towing mirrors to see the back corners of what you're towing (that's the general rule of thumb) then these mirrors would be very suitable, especially if you're towing a lot. I should hook the van up this weekend and take it for a spin through town and back to see how the mirrors perform with the van there, but they're great without it.
 
I reversed up to the van nice and straight and placed the towball up against the van's hitch. Extended the mirrors and here are the results. Made the pics a little larger so you can see in the mirrors a little better.

Yes, it's kerbside rubbish time and I'm renovating.

As you'll see, I can spot the back corners of the van nicely.

attachment.php


attachment.php


I'd say thumbs up - I like them. They do look a little on the large side.

I am a little concerned about WA regs, but I've figured a possible way of defeating them.

Rubber flares are NOT part of the body, even though they legally hide extra tyre width. However, fibreglassed flares that are permanently attached to the guards ought to be considered part of the body, so guess what I'm doing ... flaring, and looking for deeper offset rims. Won't happen in a hurry, I've run completely out of cash - I have to start saving again!
 

Attachments

  • Left side.jpg
    Left side.jpg
    59 KB · Views: 380
  • Right side.jpg
    Right side.jpg
    54.4 KB · Views: 409
Bloody tops Tony,
Really does give me a Birds Eye view of everything, if I may ask. What did the package cost you for Clear-view mirrors?? The only concern I have, is how far do they stick out??
As I am like everybody on here, and do like to venture out 4bing. I only have a concern that they may restrict accessibility to some things, out and about adventuring,?

But all in all they most definitely appear to have what I am looking for.

I appreciate your update Tony.

Cheers Geoff.

YEP!GOT A V6 'BUT I LIKE TO CUSTOMISE.
 
We're going off with the guys to Meryla State Forest so we'll have a feel for how many scratches they'll take. The indicator versions are $795 (for the pair), ARB Newcastle supplied mine and had it within a couple of days (excellent service from Peter & Ashley as always).

Unlike the original mirrors, these ones fold back and lock in the folded position, where my original mirrors would fold back and hit the weathershield (they didn't lock, they kept going). In the folded position they are nearer the car than the originals when not folded. I'd rather not re-fit my old mirrors to take measurements, but I'll get out the tape measure later and measure folded, normal and extended distances from the vertical side of the car body.
 
As promised, measurements off the door are as follows:

Locked in the collapsed position: 150mm
In the normal position: 310mm
Extended: 410mm

I think I need about 60mm flare on them guards. Couple that with an extra 60mm of wheel offset, that's 120mm of increased track width ... I'd probably get away with 50mm per side. They're still going to make the truck look bigger!
 
I don't think you would have to much trouble over here in wa, I work next door to a caravan workshop and see loads of tow vehicles fitted with these and talk to the guys there regularly and never here of people having problems with those mirrors, however next time I speak to them I'll ask if they ever here of people having problems with them.
 

Latest posts

Back
Top