


I made this tutorial when I owned a different ute. I have edited it slightly and am now reposting it here...
What you will need:
The biggest issue with sharing photos online is the size of them. Your camera usually takes massive photos so that when you print them they are excellent quality. Sharing photos online only needs photos a fraction of the size needed for printing, so we need to resize your photos. Some cameras do give you the option of setting the photo size to something a lot smaller so if you can do that then you can skip all the resizing steps below. Ideally you want an image that is 640x480 pixels for an online forum like this. You camera takes photos that are around 3600x2400 pixels!
The first step is to get your photos, so start what ever project you are doing and take photos along the way. Make some notes as well if you are planning on sharing your experience. You will forget a lot of what you did after the few beers you reward yourself upon completion.
When you have finished everything transfer your photos onto your computer into their own folder.
If you are not sure how to resize a photo and have Windows 7 or 8 then I can help. If you have Vista, XP or a Mac then you will need to do some googling. If you know how to resize photos, skip ahead.
If you can't be bothered resizing the photos on your computer you can skip ahead to the uploading step and we can resize online; the only issue you will have is the original photos you are uploading are going to be fairly large and will take a while to upload.
You can either open your photos in Paint which, from Windows 7 onwards, can easily resize images using either percentages or pixels. The other option is Photo Gallery from Microsoft which is free and pretty handy. Download and open Photo Gallery.
(Note the download will try and install all of the "Windows Essentials". Choose the option of picking your own programs when starting the installer and deselecting what you don't want/need)
(Warning: Photo Gallery has a great habit of showing the thumbnails of any images you have recently downloaded. Boys, do not open Gallery with someone else watching your screen if you have hidden folders full of images on your computer)
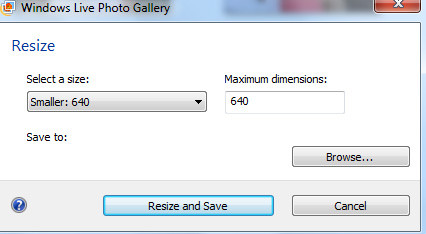
Browse to your photos in Photo Gallery, highlight the photos and choose resize from the menu-click (right-click) menu. Then select your new size, your best bet is to drop down to Smaller: 640:
Once that is completed you should probably delete the originals to save on clutter as you won't need them again (unless you plan to print any of them).
Now you need to get the images online. Head over to imgur. If you plan to upload pics frequently I would suggest signing up for an account, it's free and it's a great website.
From the front page you can upload your pics. The best thing about imgur is you can select all your photos at the same time and do a batch upload:

Note: Only tick Edit if you have not resized your images already.
If you still need to resize your images and ticked Edit you will be taken to the editing screen. Here you can rotate your image if needed and choose your new image size.
After your images are ready to be shown you will be taken to their link page. Simply move your mouse to the Message Boards link and it should automatically highlight, copy the link (Ctrl+C):

Then go into the thread you are creating and paste (Ctrl+V) the link. Leave a space above and below the [ IMG ] link. If you can't find that link just find the image link and press that little tree image on the forum. To display an image on the forums it has to look like this:
[IMG ]http://imgur.com/Ytf4F.jpg[/IMG ]
(Spaces have been added after each IMG text to avoid the image being shown instead)
Once you have finished writing your how to, create a few "Tags" for search purposes. Eg. If you are creating a How To for installing new windscreen wipers you would use "windscreen, wipers, fit, install, diy". Tags are used to make your post easier to find when people are searching the forums.
When you are writing the title of your post, remember that people will want to find your thread by searching. Use appropriate and relevant keywords in your title so that people searching for a solution you have provided can find it.
Preview Post to check your layout and once you are happy, submit.
If you have any issues post them here and I can help out.
Happy sharing!
What you will need:
- A Navara
- A digital camera
- The internet
- An idea or tip you have and others may want
- Some spare time
The biggest issue with sharing photos online is the size of them. Your camera usually takes massive photos so that when you print them they are excellent quality. Sharing photos online only needs photos a fraction of the size needed for printing, so we need to resize your photos. Some cameras do give you the option of setting the photo size to something a lot smaller so if you can do that then you can skip all the resizing steps below. Ideally you want an image that is 640x480 pixels for an online forum like this. You camera takes photos that are around 3600x2400 pixels!
The first step is to get your photos, so start what ever project you are doing and take photos along the way. Make some notes as well if you are planning on sharing your experience. You will forget a lot of what you did after the few beers you reward yourself upon completion.
When you have finished everything transfer your photos onto your computer into their own folder.
If you are not sure how to resize a photo and have Windows 7 or 8 then I can help. If you have Vista, XP or a Mac then you will need to do some googling. If you know how to resize photos, skip ahead.
If you can't be bothered resizing the photos on your computer you can skip ahead to the uploading step and we can resize online; the only issue you will have is the original photos you are uploading are going to be fairly large and will take a while to upload.
You can either open your photos in Paint which, from Windows 7 onwards, can easily resize images using either percentages or pixels. The other option is Photo Gallery from Microsoft which is free and pretty handy. Download and open Photo Gallery.
(Note the download will try and install all of the "Windows Essentials". Choose the option of picking your own programs when starting the installer and deselecting what you don't want/need)
(Warning: Photo Gallery has a great habit of showing the thumbnails of any images you have recently downloaded. Boys, do not open Gallery with someone else watching your screen if you have hidden folders full of images on your computer)
Browse to your photos in Photo Gallery, highlight the photos and choose resize from the menu-click (right-click) menu. Then select your new size, your best bet is to drop down to Smaller: 640:
Once that is completed you should probably delete the originals to save on clutter as you won't need them again (unless you plan to print any of them).
Now you need to get the images online. Head over to imgur. If you plan to upload pics frequently I would suggest signing up for an account, it's free and it's a great website.
From the front page you can upload your pics. The best thing about imgur is you can select all your photos at the same time and do a batch upload:
Note: Only tick Edit if you have not resized your images already.
If you still need to resize your images and ticked Edit you will be taken to the editing screen. Here you can rotate your image if needed and choose your new image size.
After your images are ready to be shown you will be taken to their link page. Simply move your mouse to the Message Boards link and it should automatically highlight, copy the link (Ctrl+C):
Then go into the thread you are creating and paste (Ctrl+V) the link. Leave a space above and below the [ IMG ] link. If you can't find that link just find the image link and press that little tree image on the forum. To display an image on the forums it has to look like this:
[IMG ]http://imgur.com/Ytf4F.jpg[/IMG ]
(Spaces have been added after each IMG text to avoid the image being shown instead)
Once you have finished writing your how to, create a few "Tags" for search purposes. Eg. If you are creating a How To for installing new windscreen wipers you would use "windscreen, wipers, fit, install, diy". Tags are used to make your post easier to find when people are searching the forums.
When you are writing the title of your post, remember that people will want to find your thread by searching. Use appropriate and relevant keywords in your title so that people searching for a solution you have provided can find it.
Preview Post to check your layout and once you are happy, submit.
If you have any issues post them here and I can help out.
Happy sharing!
Last edited: