My tub tinkering

Nissan Navara Forum

Help Support Nissan Navara Forum:

This site may earn a commission from merchant affiliate links, including eBay, Amazon, and others.

G-Dubya

Member
Joined
Oct 3, 2011
Messages
71
Reaction score
0
Location
Rockhampton, QLD
Hi all,
just thought I would post up some pics of work I have just finished in the rear tub of my Nav.

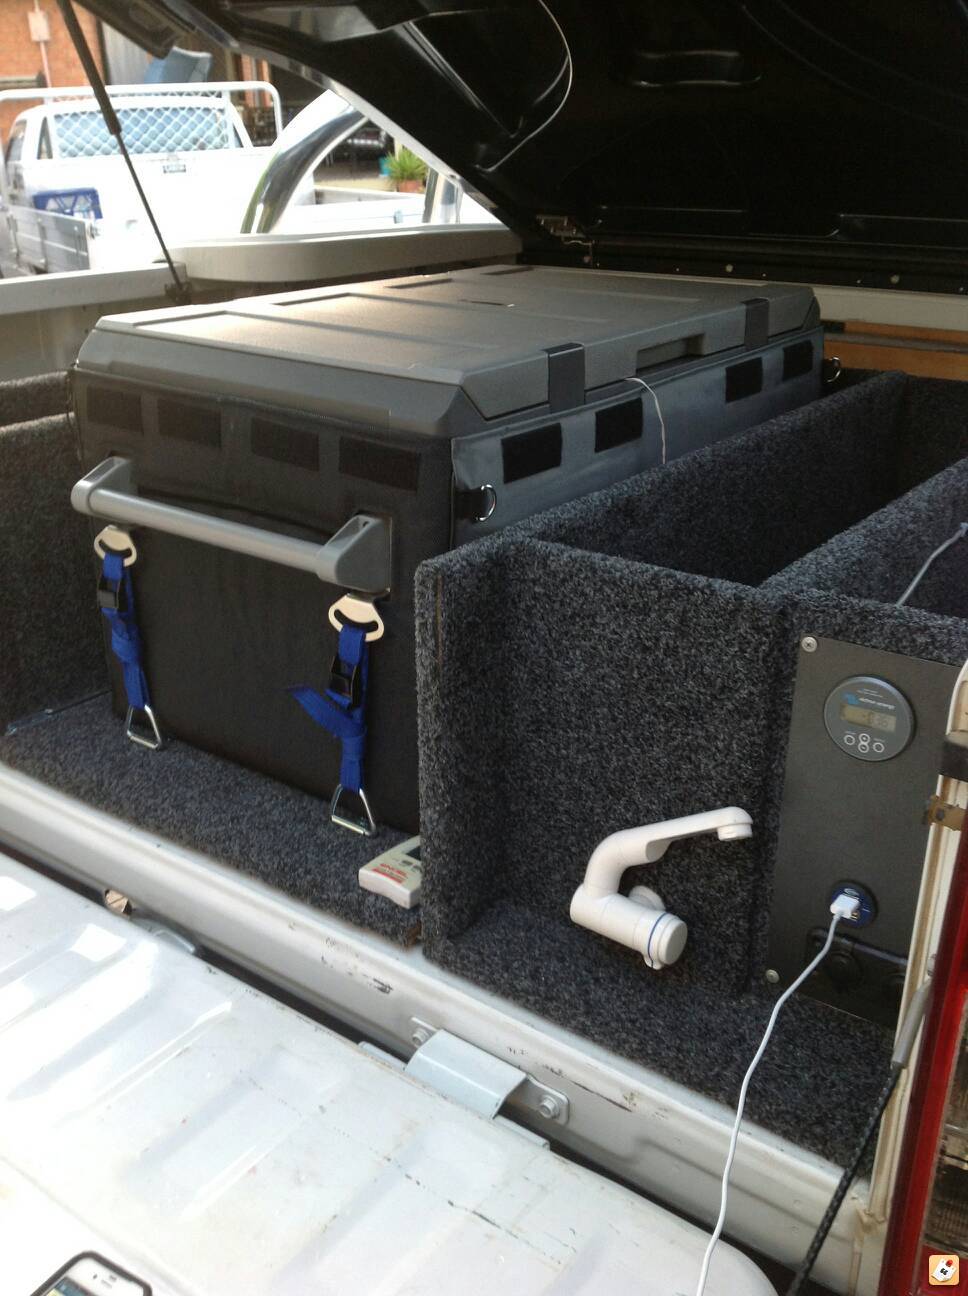
I have added a set if drawers that sit between the wheel arches. There is a flat panel across the top to make storing stuff on top of it a bit easier. I have also added two boxes that sit between the wheel arches and the back of the tub. In one box I have added a compressor, 9ltr air tank and associated hardware. In the other box I have added a Ctek D250s Dual dc to dc charger, a switch panel, 12v socket, usb charging ports and 4 Anderson plug outlets. Both boxes are connected to the front batteries using 6BS Cable (Red/Black, Twin Sheath each side).

The boxes and drawers are made out of 12mm ply. All have been sealed during construction. I have added carpet and aluminium angle to protect the corners. Only thing left to do is add some cam locks to the boxes.

All I need to do now is get a canopy on the top to get some room back. That will be the next project. Here are some pics of my efforts.
 

Attachments

  • Anderson Plugs Covered.jpg
    Anderson Plugs Covered.jpg
    96.8 KB · Views: 526
  • Anderson Plugs Uncovered.jpg
    Anderson Plugs Uncovered.jpg
    95.1 KB · Views: 507
  • Battery Box.jpg
    Battery Box.jpg
    100.6 KB · Views: 535
  • Compressor Box.jpg
    Compressor Box.jpg
    99 KB · Views: 514
  • Inside Compressor box.jpg
    Inside Compressor box.jpg
    79.8 KB · Views: 512
More pics.
 

Attachments

  • Inside Battery Box.jpg
    Inside Battery Box.jpg
    106.2 KB · Views: 421
  • Drawers Open.jpg
    Drawers Open.jpg
    97.3 KB · Views: 404
  • Compressor Connector and Gauge.jpg
    Compressor Connector and Gauge.jpg
    91.5 KB · Views: 430
  • Rear Tub Wide View.jpg
    Rear Tub Wide View.jpg
    104.9 KB · Views: 1,084
  • The CTEK D250s Dual.jpg
    The CTEK D250s Dual.jpg
    99.2 KB · Views: 467
And a couple more pics.
 

Attachments

  • Switchpanel 12v Socket and USB Charging Ports.jpg
    Switchpanel 12v Socket and USB Charging Ports.jpg
    97.9 KB · Views: 418
  • Inside Drawer.jpg
    Inside Drawer.jpg
    98.3 KB · Views: 296
Very nice setup I lie the air tank idea I need to fit one in mine somewhere....

Where'd you find that switch panel??
 
Very nice setup I lie the air tank idea I need to fit one in mine somewhere....

Where'd you find that switch panel??

It is a NARVA panel. I bought it off Ebay for around $100 (http://www.ebay.com.au/itm/NARVA-6-..._Parts_Accessories&hash=item4ac712d8c1&_uhb=1). It's good in that there are indicator lights when a switch is on and there are individual fuses for each switch (up to 20a each the box said).

Considering I'm no tradesman, I'm very happy with how it has finished.
 
Looks very tidy none the less. Much the same as my set up.
uhenyge2.jpg


I made a panel it off some aluminum and bought basic marine on off switches.
Didn't think to add an air tank though bugger!
 
I had an ARK power pack that the 100ah battery was housed in prior to going into the tray. Rather than buy 2 new 130ah batteries, I decided I would save a few dollars and get another 100ah (exactly the same as the one I already own) and put it back into the ARK power pack. I also ran an Anderson plug through the top of the box that connects to the battery terminals inside via a 50a circuit breaker. I was thinking I could use a lead to connect the Anderson plug on the power pack to one of the auxiliary plugs coming off the battery that's connected to the CTEK. When travelling I could have both batteries connected to the CTEK and separate them once at the camp. Can anyone out there see any dramas doing this?
 
G'day buddy,
I'm looking at roughly the same setup so pretty keen to get some responses as well.have the Ark Powerpack as well plus an additional battery box both 100 amp hours.
 
Just when I thought I had this all sorted....the compressor died. My Dad got me an Ironman Flo Pro Max for my birthday and I thought I could use it to replace the POS compressor from Ebay. Unfortunately the new compressor was a lot bigger than the old one and wouldn't fit into the box with the air tank. I was a bit unsure about hard wiring the new compressor in while it was still under warranty so I just carried it in it's own bag. Now the warranty has expired I changed things around a bit to fit it in.

I did have two drawers in the back. I rarely had anything in one so I removed it and used the space it left to house the 9ltr air tank and Ironman compressor. I wired it up through a relay to the auxiliary battery in the tub and hooked it up to a switch on the panel in the tub.

There was still a heap of room next to the air tank that could be used so I partitioned it off and used the space to store heavier items like my tool bag, recovery gear, drag chain and a brick.

To close this up I used the front panel off the old drawer and mounted it on hinges.

To save opening this side whenever I needed to use the compressor I also ran a line into the old compressor box and placed a female nitto coupler on the end of it. In this box I also keep the coiled air hose and tyre inflator for easy access.

The compressor fills the 9ltr air tank in just under 2 minutes and 30 seconds and I can turn it on when I start home and it is full and ready to use when needed.

Just going to make the top of the compressor/tank side a little easier to access and it will be done.
 

Attachments

  • 20150704_151908 (3).jpg
    20150704_151908 (3).jpg
    141.8 KB · Views: 166
  • 20150704_151621 (3).jpg
    20150704_151621 (3).jpg
    102.1 KB · Views: 157
  • 20150704_151608 (3).jpg
    20150704_151608 (3).jpg
    64.1 KB · Views: 157

Latest posts

Back
Top