Chris's D21 thingo

Nissan Navara Forum

Help Support Nissan Navara Forum:

This site may earn a commission from merchant affiliate links, including eBay, Amazon, and others.
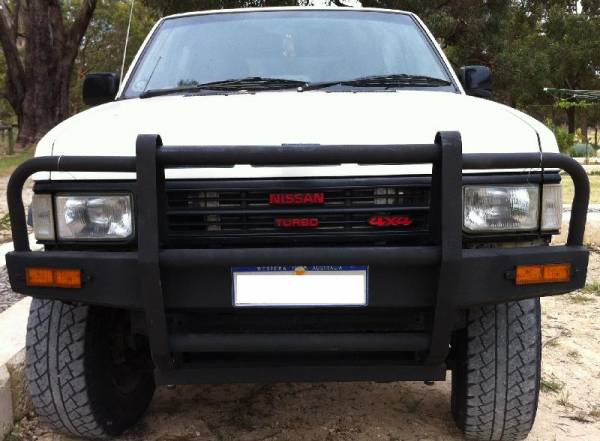
Spare wheel hangar - Terrano or not Terrano....

OK, so I like the spare wheel hangar on the Terrano, but, having had a look at the strength available in the ute, it isn't up to the job of carrying all that weight, particularly when open and all the weight is acting on a long lever.

I thought I'd take off the inner tub skins to be sure. The screws REALLY didn't want to come out, but I showed them who was boss (I had power tools and they didn't) and got the skin off.

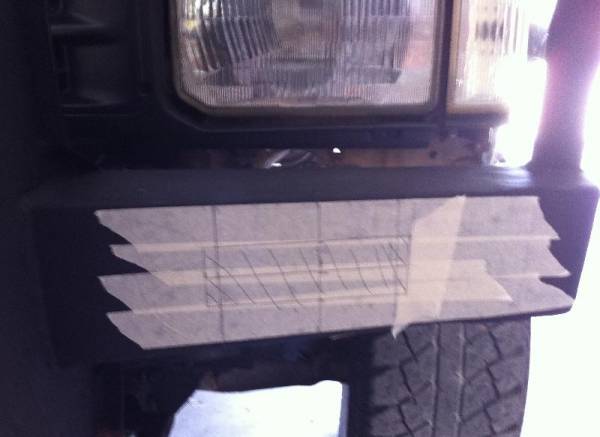
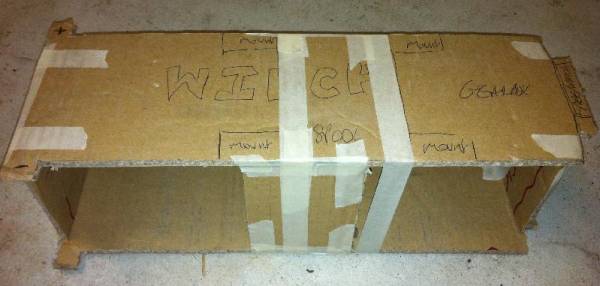
Yep - not strong enough. There was about 52mm between the inside edge of the skin and the outer wing, so I made up some 50x100 cardboard sections and had a play to see where I could reinforce the O/S/R corner, without it looking like a dogs breakfast. (The great thing about cardboard is it is easy to make and cut, it is light, it will show you EXACTLY what will fit and what won't AND you can join it with masking tape - no welder needed.)

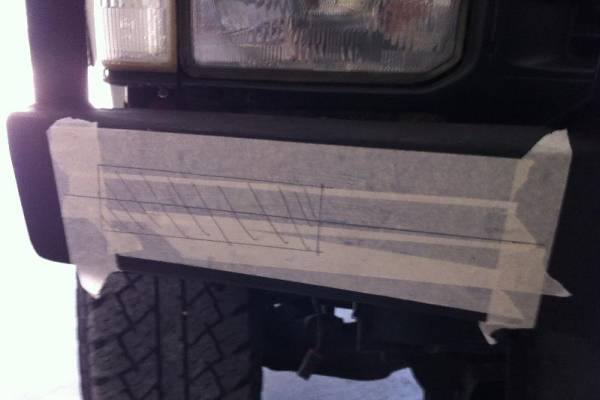
It went in quite well:

Boxwork.jpg

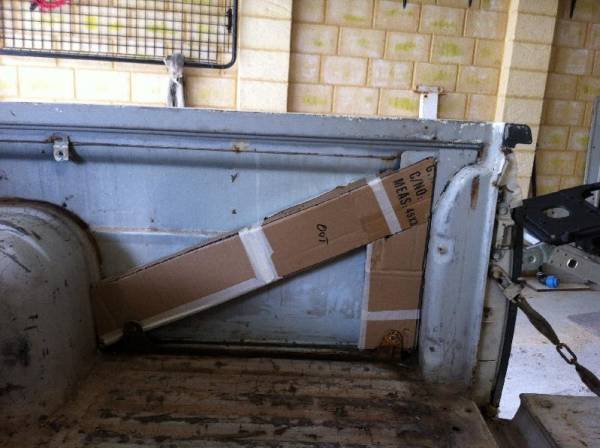
It would all be made from thick-walled 50x100 box section, with the diagonal piece welded to the inner wheel arch and the top of the O/S/R tailgate post to support the upper Terrano mount. Maybe a load-spreader plate at the arch end.

The vertical section would be welded to the diagonal piece and go down and through the tub floor to support the lower Terrano mount.

From the bottom of the vertical section would come another piece of box that would come forward to the tub's chassis mount, under the tub.

The eight bolts that hold the wheel mount on would go through holes in the box section and short lengths of thick-walled tube would be welded inside the box section so the compression of these bolts didn't crush the box.

It may be that I add a further brace - horizontal from the rear of the tub, to the front of the tub, again, behind the inner skin. I need to think on that a bit.

The downside of cardboard is that it goes soggy when wet. It started to rain, so I parked it up and waited for something a little more like summer...

I'll keep thinking in the mean time and if anyone who reads this has any comments, PLEASE speak up. It only works if it works - I get no points for effort if I do all this and it bends something.

Have a great weekend, chaps! I've got to go and buy some replacement screws for the tub skin. I may have won in getting them out, but they went down fighting! :rofl2:
 
Bull Bar

Having plated up the bull bar to get rid of the rust, it is now as strong as it was when new. Maybe stronger. With a bit of filler and some paint, it looks similar to the way it did when new, too.

To get an idea where the mounts needed to be, I needed to dry-fit the bull bar to the ute.

Off came the bumper and I hung the bar where it needed to sit.

I think it looks pretty good!

bullbar2.jpg


(If anyone thinks I have a trolley jack sitting on a bit of steel box, sitting on a milk crate, all supporting a very heavy steel bullbar - It's a trick of the light.
It is REALLY strong and would pass any H&SE test.):nono:

I then marked its position onto strategically placed strips of masking tape, so I would know where all the major structures needed to be when I finished.

I have made up some cardboard templates for mounts. I also utilised a couple of 12mm threaded holes in the front of each chassis rail for a second set of mounts. It shouldn't fall off...

Now I can start cutting steel, drilling holes and welding bits together.

Yee Haw!
 
With the spare wheel mount, don't forget you'll need substantial bracing for the latch as well. It's not just a latch, it supports the mass of the spare wheel & carrier whilst driving. Otherwise, it looks like you're on the right path. I mangled the tray on my old ute with a crane, because I didn't do a good enough job of bracing its bolt-down point.
 
With the spare wheel mount, don't forget you'll need substantial bracing for the latch as well. It's not just a latch, it supports the mass of the spare wheel & carrier whilst driving. Otherwise, it looks like you're on the right path. I mangled the tray on my old ute with a crane, because I didn't do a good enough job of bracing its bolt-down point.

Cheers, Dion.
Yep - figuring I need to make it as bulletproof as I can if I want to "do it once" and just be able to count on it...

I'll work something out!
 
Well done Chris she's looking awesome.
Well done on the front end upgrade and paint too looks great.
 
Progress!

Well, I put an ad on Gumtree looking for a replacement tailgate (mine was full of filler and rust).

:redcool: SUCCESS!

I picked up a pretty good tailgate yesterday. I am putting aside the bull bar work to get this prepped and sprayed.

While I was there, I also picked up a rigid canopy:

Rigid_canopy.jpg


Not sure if I even want a rigid canopy, but an offer was made and accepted.
I'll clean it up and keep it for traveling...
 
nice work mate, im building an 86 single cab at the moment. bloody hard to figure out some things on the front with customizing a bull bar/winch cradle for it though
 
nice work mate, im building an 86 single cab at the moment. bloody hard to figure out some things on the front with customizing a bull bar/winch cradle for it though

Thanks for that and I can certainly feel your pain...
I seem to have spent ages adapting a whole heap of somethings to get them to do something else.

One thing that has helped me a whole heap is CARDBOARD.

It is OK to lift the winch up to see where it goes and how you can mount it, but they are heavy and awkward and they assisted me in knocking a knuckle or two.

I copied its external dimensions in cardboard and I now trial-fit that.

Winch_-_cardboard.jpg


I won't weld/cut/drill/whatever without checking it with the real thing, but it really is easy to tape it in position and be able to see if it will fit.

I may not have invented the whole "making patterns out of cardboard" thing, but I'm glad SOMEONE did.

Have a great week and thanks again.
 
I did a few odds and ends today...
I fitted electric regulators in the front doors and built my own loom, mimicking the way the windows are set up on the Commodore. I took out the cigarette lighter socket (giving me a square area for switches, as well as a 15A power supply) and cut out the panel to fit the pair of switches I bought from eBay.

Electric_Window_Switches.jpg


The switches I picked had 15A rated contacts, so I could do away with the need for relays (Even stalled, I measured the regulator current draw as 8.86A). This meant that I only needed a twin-core high current cable into each door, hooked up to the standard electric regulator.

Works a treat!

I won't miss the accessory socket (that's what they call the Cigarette Lighter socket these days :yeahright:)

While I was in there, I replaced the heater fan assembly, as the fan was damaged and vibrated terribly if switched to 3 or 4.

I also picked up a pair of really nice seats from a 1996 Terrano, so I got them in and they look great and feel great.

seat.jpg


I finished painting the new tailgate and got that on. It really is looking pretty good! (I do think it needs some stickers, though...)

Tailgate.jpg


This is a whole heap of fun!
 
N i g h t m a r e d a y ! ! !

I bought a new set of locks (The old ones were REALLY worn and if you get the key in the wrong way around, it wouldn't work reliably) ...

Replacement_locks_and_ignition.jpg


... and I replaced the ignition switch & lock yesterday and that was great.

I had a horrible day with the truck today.
I tried to fit replacement door lock barrels. I popped the link rod off the back of the old barrel, removed the clip, removed the old barrel, fitted the new one, re-fitted the clip and went to re-attach the link rod.
Couldn't find it.

Eventually found it laying in the bottom of the door. Inspection showed that the plastic retainer was brittle and had snapped off.

FIRST PROBLEM - What was this little bit of plastic called, so I could see if I could get a replacement?? Google was no use, nor was the manual-on-a-CD that I had.

Fortunately, I got on to the Parts Dept at Mandurah Nissan and spoke to a guy called Paul.

He was SO HELPFUL! Spent time with me to make sure we could positively identify the part I was after and he even emailed me a picture -

Door_lock_parts_-_Schematic.png


The broken part was identified as part number 80510J and they were $13.86 for pack of 5. They were not in stock, but Paul got them delivered to him later that day!

WOW - All this service for less than $14!

The new ones looked a lot better than the old ones -

Broken_Piece_3_-_replacement_parts_bought.jpg


- and they went in a treat!

Broken_Piece_4_-_replacement_parts_fitted.jpg


This is where things got REALLY silly...

I have LARGE hands. They struggle inside car doors at the best of times, but, right at the edge, messing with stupid little bits of plastic are not what they were designed for.

T-H-R-E-E H-O-U-R-S L-A-T-E-R

... and I still haven't got the first one installed.

AAAAARRRRGGGGHHHH!!!

Now I am second-guessing myself and think I may have them upside-down and back-to-front and in the wrong door and.....

Does anyone know what this should look like?

A pic inside a door would be GREAT, as I think I might just book the truck into Mandurah Nissan to get them to fit them. Has anyone got a schematic, or a photo, or WHATEVER. Anything that shows me which way around part no 80527M and 80527N go (see schematic above).

DOOR LOCKS!

Surely not...
 
Wow if i'd known they were that cheap i'd have bought a set instead of making replacements out of coathanger wire. I've never had that much trouble fitting them, and my hands are on the larger side though certainly not huge? Haven't got a photo but yeah, they've never been that troublesome. Have you tried holding your mouth a different way?

The parts schematic shows you which way they go (it is a schematic of the RH door). Also I vaguely remember maybe having the latch mechanism unconstrained whilst attaching them, and then attaching it after those little yellow buggers are in.
 
Last edited:
Ha! Thanks for posting, Dion.
If you want any, I have three spares...

I can get the little yellow thing into the hole it is meant to go into, and then get the white thing in from the back (that stops it coming out again).
I got the white bit around it (80527M or 80527N) and got the rod back in, through both bits of plastic and got the top bit latched in.

What I can't do is get the OTHER end of the metal rod in the right place to get it into the plastic bush/clip on the back of the lock barrel assembly. It seems to be at SLIGHTLY the wrong angle. Straightening the rod by applying pressure on it pushes the white bit (80527M or 80527N) against the door with quite a bit of pressure. Doesn't seem right.

I have left it all weekend, so I will take a fresh look tomorrow!
I'll try taking the clip off the lock barrel and see if that helps.
Have a great week.
 
Bloody hell Chris, this things at least tripled in value since you have put all this time and effort into it.
Looking good, cant wait to see her with the bull-bar all mounted and your rear wheel carrier!

I'm going away for a couple of weeks, but when i get back i think a beach run is in order for sure!

Cheers, Christian. :top:
I'm only building on the platform you put together!!
Have a great holiday and I WILL take you up on the beach run when you get back.:agree::cheers:
 
I fixed the door locks!!!!!

I learned a valuable lesson today.

If you try to put the left-hand-door lock thingy in the right-hand-door, it won't go in and you have a really bad day...

I swapped them over today and got both locks working in about 40 mins!

Doors re-assembled for the first time in a couple of weeks!


The new indicators for the bull bar arrived today. Immersible LED's.

I couldn't decide whether to mount them in the CENTRE of the bullbar panel:

Centre_Position.jpg


... or biased towards the outside:

Outboard_Position.jpg


I drew one side one way, the other on the other side. I liked the outboard placement better (and it was within the WA legislative requirements for indicators), so I chopped holes in the bullbar and mounted them:

Mounted.jpg


I'll add a resistor in parallel to fix up the rapid-flash-because-the-flasher-relay-is-load-sensitive issue and then I can finish the top mounts for the bar itself.

H-A-P-P-Y D-A-Y-S ! ! ! !
 
Bought the resistors to fix the "fast-flash" issue today.
$35 a pair!

Resistors.jpg


According to the instructions:
"Warning: Load resistor must be mounted to metal surface.Operating temperature can reach 170 degrees Centigrade, damaging plastics, carpets and painted metal surfaces".

WOW! At least it doesn't contain any Plutonium...
I'll pop rivet them to the bull bar...

:happy:
 

Latest posts

Back
Top